
When coding in LotusScript, please pay attention to your comments so the information needed by a developer making calls to your code, is available in the editor popups.
Consistent “to do” flagging
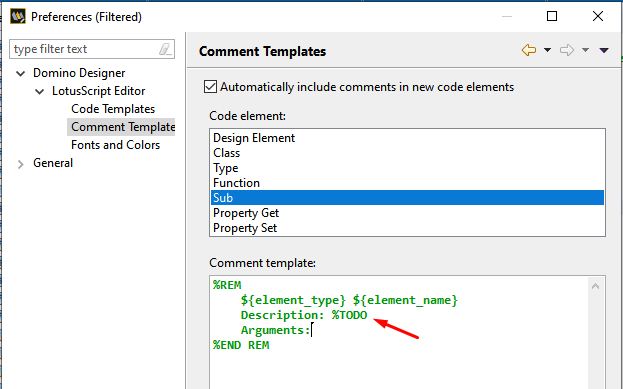
It’s easy, in the midst of writing code, to think you’ll come back and document something later, then forget to do it. To help me remember, I have one consistent string to flag all the locations I need to follow up on. Something I can put in my comment templates in the editor, and also short enough to type manually in comments within a module.
I use %TODO for this. It’s short, it’s clear, and it’s unique — unlikely to appear in the code except for this purpose. But choose your own string.
So in the comment templates in the LotusScript editor preferences, I change the default “Comment for …” strings to say “%TODO” instead, and provide labels for lines I want to include.
Make parameter names meaningful

When you type “.” after a variable name, you automatically get a list of public methods and properties (as shown above). Function parameter names are included in this popup, for instance the Value parameter of Push. The parameter names are part of the function’s hover help, please choose meaningful names.
Function and Sub header comments
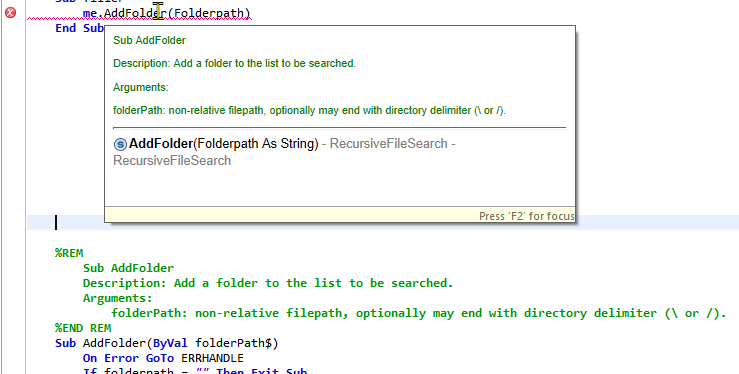
The content assist as you type, or when you hover over a function name, comes from the “%REM” comment preceding the function. This image shows the comment for AddFolder in the code and how it’s displayed in the popup. Indentation is lost, but the words are all there. This is the best place to insert information about calling parameters and (for a function) return value.
Comment template for Sub
%REM
	${element_type} ${element_name}
	Description: %TODO
	Arguments:
%END REM
Comment template for Function
%REM
	${element_type} ${element_name}
	Description: %TODO
	Arguments:
	Returns:
%END REM
Comments for Property Get and Property Set
The default comment template for programmed properties includes the variable “${element_type}”, which is either Property Get or Property Set. However, if you have both Get and Set for the same property, only one of these header comments will ever be displayed — whichever is associated with the first Property statement for that property. So I suggest merging these into a single comment that applies to both get and set.
The comment shouldn’t say Get or Set because you don’t know which the user is doing — it should reflect both cases. That’s why I took out “${element_type}” and just put in “Property”.
%REM
	Property ${element_name} (read/write) %TODO
	Description:
	Arguments:
%END REM
Not all programmed properties have both Get and Set methods. The comment should specify whether this property is read/write, read-only, or (in the odd case) write-only. That’s why I added (read/write) on the title line, followed by a %TODO to make sure I check whether that’s true of this property.
I also have to remember to fill in the blanks for Description and Arguments, if any, but I figure one %TODO per comment template is enough to get me to review it. I don’t want to nag myself.
Comments for Type
I don’t use Type definitions often — Classes are almost always better. But in case you use them, here’s the comment template I favor:
%REM
	${element_type} ${element_name}
	Description: %TODO
%END REM
Class header comment
The class header comment is found above the Class statement. It’s visible when the programmer types New, then selects the class name from the resulting typeahead.

They can also see the Class comment by hovering over the class name.
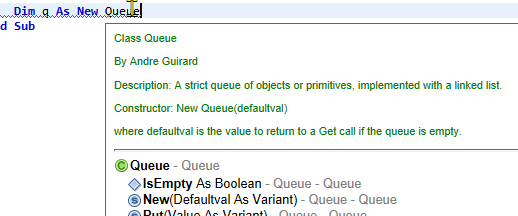
If Sub New has a header comment, you can’t see it in the popups — by hovering over the class name you can see the prototype of the New method (it’s visible at the bottom here), but often it needs more explanation than just the names of the arguments. Hovering over New doesn’t help — all that does is show general documentation of the New keyword.
That’s why I use the Class header comment to document how to create instances of that class — describe the arguments of the New method in detail, or tell people not to use the constructor but call some “CreateXXX” function instead, or whatever. Here’s my comment template for Class:
%REM
	${element_type} ${element_name}
	By ${author}
	Description:
	Constructor: New ${element_name}(%TODO)
%END REM
Comments on variables and constants
In those cases where a comment is warranted on a variable, class property, or “Const” definition, programmers often like to put it afterwards on the same line, e.g.:
Public Const WF_FLIP = 8 ' enable automatic two-phase waffle prep.
or if it’s long, the comment might appear on the following line, indented. It would be nice if LotusScript would pick up comments in these places and apply them as the hover help for that name. Unfortunately, it does not.
To provide hover help for a constant, property, or variable, the comment must appear on the line preceding the definition.
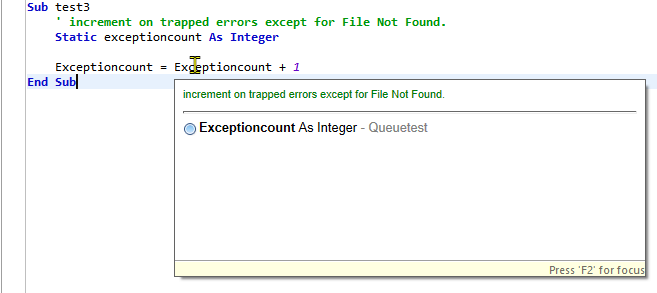
This isn’t where people are used to seeing comments about variables, so you may have to add a blank line above the comment for clarity if you do this. If you feel like asking HCL to recognize comments on the same line after a declaration, please go ahead.
Library header comments
The comment block at the start of a LotusScript Library appears in a popup when you hover over the library name in a Use statement, or when you use Ctrl+Space to bring up the list of available libraries after typing Use.
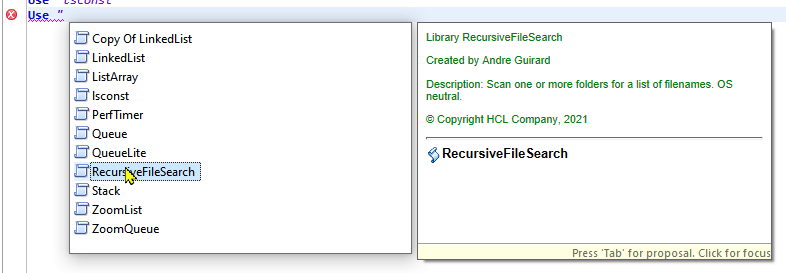
With this in mind, it’s helpful to have a description of the library’s purpose early on, so it can be seen without scrolling. Lengthy copyright notices and the like can go below that.
So, I suggest you set the comment template to something like:
%REM
	${designelement_type} ${designelement_name}

	%TODO description!

	by ${author}

	Copyright ${year} Yoyodyne Industries, etcetera...
%END REM
If there’s some standard copyright statement your company’s lawyers like you to include, you could include the whole thing here. Easy enough to delete it in cases where it’s not required.
You can (and should) also export these preferences. Open Package Explorer (other standard Eclipse perspectives would probably also work). It’s not available via a menu option, so right-click in Package Explorer and choose Export…. In the dialog that appears, under the General category select “Preferences”. Save the .epf file to whatever backup area you choose. If you wish, you can open the file in your preferred text editor. Screenshots are available on an old blog post I did https://www.intec.co.uk/quick-setup-restore-of-domino-designer/.
personally, I drop the Description: label and just put in the description.
that’s a fair point